

Folding Adirondack Chair & Footstool Downloadable Plan
Folding Adirondack Chair & Footstool Downloadable Woodworking Pattern
Muskoka Folding Chair & Footstool Plans


Unlike a regular Adirondack chair, where there are many different styles, most folding chairs seems to be fairly similar in the way they fold.
Unfortunately, most chairs that I have seen, utilize the "flipper" behind the back support. Most of these chairs are bolted using one washer, or none, in between the folding parts. Some designs rub on the sides of the main frame support, and over time show scraping marks, and can also bind if folded after moist weather.
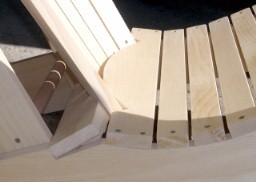
In designing this chair, I felt it was important to keep the integrity of the original chair design, with the tapered back support. Since I, and many fellow Canadian cottagers, prefer to paint our chairs in bright colours, it was also important that there was sufficient space between the folding parts, yet keeping the structural strength.
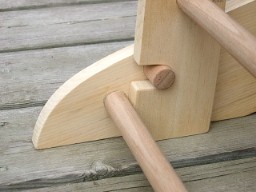
In experimenting with various options, including nylon futon bushings and metal porch glider mechanisms, I found an inexpensive and strong solution to the needs of this design. While you can still build this chair using regular carriage bolts with washers between the folding parts, over time the holes may get larger and the chair may get sloppy.
The plans include the alternate use of carriage bolts encased in polyethylene tubing and custom made 1/4" washers, using UHMW plastic, used for table saw and router jigs for smooth movement. All parts are readily available at Home Depot, Rockler Hardware and Lee Valley Tools, as well as many other leading woodworking supply stores.
The image above, showing the chair in the upright position, is identical to the original in position and comfort. The image in the middle shows the chair reclined to 50 degrees....a very comfortable snoozing position. The back is supported by the arms and curved back seat slat, and all pieces are screwed and glued with Gorrilla Glue for the necessary strength. A recent Customer picked up some plans at my home and sat in one of the final prototypes. He found it very comfortable in the reclined position, and strong enough to hold his over 6' height and 210 lb. weight.
The right hand image shows the chair folded to 12 1/2" (3.81cm) and can hang on the wall of my garage.To fold the chair, push on the back and walk it forward into the folded position. To open the chair, pull up on the back. The chair will open to the reclined position, then pull on the back support to put it in the regular 65 degree angle. To recline the chair, while sitting in it, reach back and pull the back support forward. Lean back and relax!
If you are using your chairs on uneven ground or on the beach, you may want to add stop locks to the back supports. This will eliminate the back from reclining into the sand. To fold the chair, push the back support forward to unlock it, and fold forward.
The chair can be constructed of 3/4" (1.9cm) pine, cedar or redwood, with all pivot parts of 1/1/4" (3.2cm) stock for extra strength and gluing surface. Plans include pictures and dimensions of the taper sled I use on my table saw, to cut the back slats and back support pieces.
The plans include part sizes, assembly instructions with matching step-by-step photos, parts pictures and full size paper cut-outs, which you can trace onto hardboard for permanent templates. Each is lettered in order of assembly, and the pivoting parts are marked and measured for bolt locations. Instructions also include expanded images of the step-by-step procedure.
The downloadable instructions are on Adobe Acrobat ![]() . The templates will print clearly for transferring onto 1" x 1" graph paper you can make with a roll of brown packing paper. All plans are in standard and metric dimensions.
. The templates will print clearly for transferring onto 1" x 1" graph paper you can make with a roll of brown packing paper. All plans are in standard and metric dimensions.
For your FREE download, click ![]()
Dimensions - 32 1/2"W x 37"D x 38"H (82.6cmW x 94cmD x 96.5cmH)
Download your scroll saw patterns right away! Click the link on the Thank You Page after your purchase completes, or Click the Name of the Scroll Saw Pattern in your Receipt email from Bear Woods Supply.


Write a Review || | Explore all
Featured positive reviews:
I recently purchased the folding adirondack chair plan after looking at many others on the Web. The plans were accurate and complete. I used the plastic tubing for bushings and plastic washers as suggested. I made a chair in a few days and it turned out perfect. I did not incorporate the locks but i plan to add them and include them on my next chair. I made the chair out of western red cedar and clear coated it with Min Wax Helmsman clear coat. I cut it from 1x10 material. For the few ! 1/4 inch pieces I planed the 3/4 to 5/8 and laminated the pieces together with Tite Bond II. The red cedar was rough on one side so I ran it through my planer and got a nice smooth surface. Transferring the plan from graphics provided took a little time. You may want to consider offering a full size paper plan for the curved pieces. Great plan. The only piece that had to be fitted was the Back seat slat ( R ) which was noted in the instructions. I am a retired hobbyist and most of the projects I build
I recently purchased the folding adirondack chair plan after looking at many others on the Web. The plans were accurate and complete. I used the plastic tubing for bushings and plastic washers as suggested. I made a chair in a few days and it turned out perfect. I did not incorporate the locks but i plan to add them and include them on my next chair. I made the chair out of western red cedar and clear coated it with Min Wax Helmsman clear coat. I cut it from 1x10 material. For the few ! 1/4 inch pieces I planed the 3/4 to 5/8 and laminated the pieces together with Tite Bond II. The red cedar was rough on one side so I ran it through my planer and got a nice smooth surface. Transferring the plan from graphics provided took a little time. You may want to consider offering a full size paper plan for the curved pieces. Great plan. The only piece that had to be fitted was the Back seat slat ( R ) which was noted in the instructions. I am a retired hobbyist and most of the projects I build
Folding Adirondack Chair & Footstool Downloadable Woodworking Pattern
Muskoka Folding Chair & Footstool Plans
Unlike a regular Adirondack chair, where there are many different styles, most folding chairs seems to be fairly similar in the way they fold.
Unfortunately, most chairs that I have seen, utilize the "flipper" behind the back support. Most of these chairs are bolted using one washer, or none, in between the folding parts. Some designs rub on the sides of the main frame support, and over time show scraping marks, and can also bind if folded after moist weather.
In designing this chair, I felt it was important to keep the integrity of the original chair design, with the tapered back support. Since I, and many fellow Canadian cottagers, prefer to paint our chairs in bright colours, it was also important that there was sufficient space between the folding parts, yet keeping the structural strength.
In experimenting with various options, including nylon futon bushings and metal porch glider mechanisms, I found an inexpensive and strong solution to the needs of this design. While you can still build this chair using regular carriage bolts with washers between the folding parts, over time the holes may get larger and the chair may get sloppy.
The plans include the alternate use of carriage bolts encased in polyethylene tubing and custom made 1/4" washers, using UHMW plastic, used for table saw and router jigs for smooth movement. All parts are readily available at Home Depot, Rockler Hardware and Lee Valley Tools, as well as many other leading woodworking supply stores.
The image above, showing the chair in the upright position, is identical to the original in position and comfort. The image in the middle shows the chair reclined to 50 degrees....a very comfortable snoozing position. The back is supported by the arms and curved back seat slat, and all pieces are screwed and glued with Gorrilla Glue for the necessary strength. A recent Customer picked up some plans at my home and sat in one of the final prototypes. He found it very comfortable in the reclined position, and strong enough to hold his over 6' height and 210 lb. weight.
The right hand image shows the chair folded to 12 1/2" (3.81cm) and can hang on the wall of my garage.To fold the chair, push on the back and walk it forward into the folded position. To open the chair, pull up on the back. The chair will open to the reclined position, then pull on the back support to put it in the regular 65 degree angle. To recline the chair, while sitting in it, reach back and pull the back support forward. Lean back and relax!
If you are using your chairs on uneven ground or on the beach, you may want to add stop locks to the back supports. This will eliminate the back from reclining into the sand. To fold the chair, push the back support forward to unlock it, and fold forward.
The chair can be constructed of 3/4" (1.9cm) pine, cedar or redwood, with all pivot parts of 1/1/4" (3.2cm) stock for extra strength and gluing surface. Plans include pictures and dimensions of the taper sled I use on my table saw, to cut the back slats and back support pieces.
The plans include part sizes, assembly instructions with matching step-by-step photos, parts pictures and full size paper cut-outs, which you can trace onto hardboard for permanent templates. Each is lettered in order of assembly, and the pivoting parts are marked and measured for bolt locations. Instructions also include expanded images of the step-by-step procedure.
The downloadable instructions are on Adobe Acrobat ![]() . The templates will print clearly for transferring onto 1" x 1" graph paper you can make with a roll of brown packing paper. All plans are in standard and metric dimensions.
. The templates will print clearly for transferring onto 1" x 1" graph paper you can make with a roll of brown packing paper. All plans are in standard and metric dimensions.
For your FREE download, click ![]()
Dimensions - 32 1/2"W x 37"D x 38"H (82.6cmW x 94cmD x 96.5cmH)
Write a Review || | Explore all
Featured positive reviews:
I recently purchased the folding adirondack chair plan after looking at many others on the Web. The plans were accurate and complete. I used the plastic tubing for bushings and plastic washers as suggested. I made a chair in a few days and it turned out perfect. I did not incorporate the locks but i plan to add them and include them on my next chair. I made the chair out of western red cedar and clear coated it with Min Wax Helmsman clear coat. I cut it from 1x10 material. For the few ! 1/4 inch pieces I planed the 3/4 to 5/8 and laminated the pieces together with Tite Bond II. The red cedar was rough on one side so I ran it through my planer and got a nice smooth surface. Transferring the plan from graphics provided took a little time. You may want to consider offering a full size paper plan for the curved pieces. Great plan. The only piece that had to be fitted was the Back seat slat ( R ) which was noted in the instructions. I am a retired hobbyist and most of the projects I build
I recently purchased the folding adirondack chair plan after looking at many others on the Web. The plans were accurate and complete. I used the plastic tubing for bushings and plastic washers as suggested. I made a chair in a few days and it turned out perfect. I did not incorporate the locks but i plan to add them and include them on my next chair. I made the chair out of western red cedar and clear coated it with Min Wax Helmsman clear coat. I cut it from 1x10 material. For the few ! 1/4 inch pieces I planed the 3/4 to 5/8 and laminated the pieces together with Tite Bond II. The red cedar was rough on one side so I ran it through my planer and got a nice smooth surface. Transferring the plan from graphics provided took a little time. You may want to consider offering a full size paper plan for the curved pieces. Great plan. The only piece that had to be fitted was the Back seat slat ( R ) which was noted in the instructions. I am a retired hobbyist and most of the projects I build
Download your scroll saw patterns right away! Click the link on the Thank You Page after your purchase completes, or Click the Name of the Scroll Saw Pattern in your Receipt email from Bear Woods Supply.

 Add to Cart


 Cart
Cart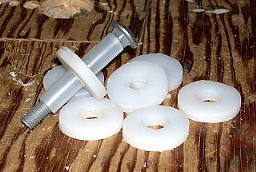