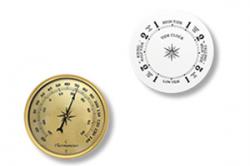
Barometer
This barometer was designed to give the user accurate air pressure readings from sea level to an altitude of 7000 feet. Before leaving the factory your barometer was calibrated to standard air pressure at sea level. For your barometer to give you optimum results, you will have ro re calibrate it to your local barometric pressure before use.
Locate your barometer in an are where it will remain undisturbed. Do not position it in direct sunlight, as this could cause inaccurate readings.
You need to calibrate your barometer to your location. This can be done by getting the local pressure from a local radio or television station. Use a small slotted screwdriver to turn the small screw on the back of the barometer case to adjust your barometer until the black pressure indicator hand points to a reading that corresponds to your known local barometric pressure. Your barometer has now been calibrated.
For daily operation of your barometer, place the gold pointer attached to the lens directly over the black pressure indicator hand.
This will allow you to measure any change in pressure that may have taken place. It is the amount of change in pressure and the rate of that change that will be an indicator of the weather.
The following basic rules will hold true in using the barometer to predict weather conditions:
Hygrometer
Instructions For Your Hygrometer
This hygrometer was designed to measure relative air moisture indoors. It measures the amount of water vapor present in room air as compared to the maximum amount of water vapor that could be present (100%). This hygrometer must be keep in a mildly humid environment to work properly.
Your hygrometer was preset at the factory and will not normally need adjustment. It must be allowed to stabilize for 1-2 days in the environment in which it will be used before attempting any adjustment.
All that is normally required is an initial "moisture charge". To do this, place a damp cloth on the back of the instrument for 20 minutes. This cloth should only be damp because any water droplets that would come in contact with the spring inside the hygrometer would ruin the instrument. Once the cloth is removed the hygrometer should read about 95% (between 90% and 100% is acceptable).
If you find that an adjustment must be made, then do so very carefully. If you look through the back of the instrument you will notice a coil spring that is held in place by a gold color support bracket. This support bracket lies against the dial and has a small tab that comes away from the dial at a right angle (). This small tab has red plastic pin going through it and holding the coil in place. Do not touch this red plastic pin or the coil at any time. To adjust the reading on the dial of your hygrometer, use a small screwdriver to push on the side of the metal tab. This will turn the entire support bracket. The support bracket should be turned in whichever direction will give you the reading that you desire. Please remember that a hygrometer reacts very slowly to changes in the environment. Allow 24-48 hours once the instrument has been located before determining if the instrument is operating properly.
Operating tolerance +/- 5%
Thermometer
This dial thermometer is designed for indoor use only and provides an accurate measurement of air temperature in the immediate vicinity of the instruments location. Please locate the instrument indoors in a location that represents average air temperature. Avoid locations next to drafts, ovens, air conditioners or heat registers.
Your thermometer was pre set at the factory and will not normally need adjustment. Allow the thermometer to operate for at least 24 hours once it has been located before determining if it is operating properly.
If you find that an adjustment must be made, then do very carefully. If you through the back of the instrument you will notice a coil spring that is held in place by a gold color support bracket. This support bracket lies against the dial and has a small tab that comes away from the dial at a right angle (). This small tab has a red plastic pin going through it and holding the coil in place. Do not touch this red plastic pin or the coil at any time. To adjust the reading on the dial of your thermometer use a small screwdriver to push on the side of the metal tab. This will turn the entire support bracket. The support bracket should be turned in whichever direction will give you the reading that you desire.
Operating tolerance: +/- Two degrees Fahrenheit


 Cart
Cart